试题详情
试题展示
页面结构
pages/QuestionPage.ets
import { HcNavBar, HcTag } from '../commons/components'
@Entry
@Component
struct QuestionPage {
@StorageProp('bottomHeight') bottomHeight: number = 0
@Builder
TitleBuilder(text: string) {
Row() {
Text()
.width(2)
.height(12)
.backgroundColor($r('app.color.black'))
.margin({ right: 13 })
Text(text)
.fontWeight(700)
}
.width('100%')
.padding({ top: 10 })
.height(32)
}
@Builder
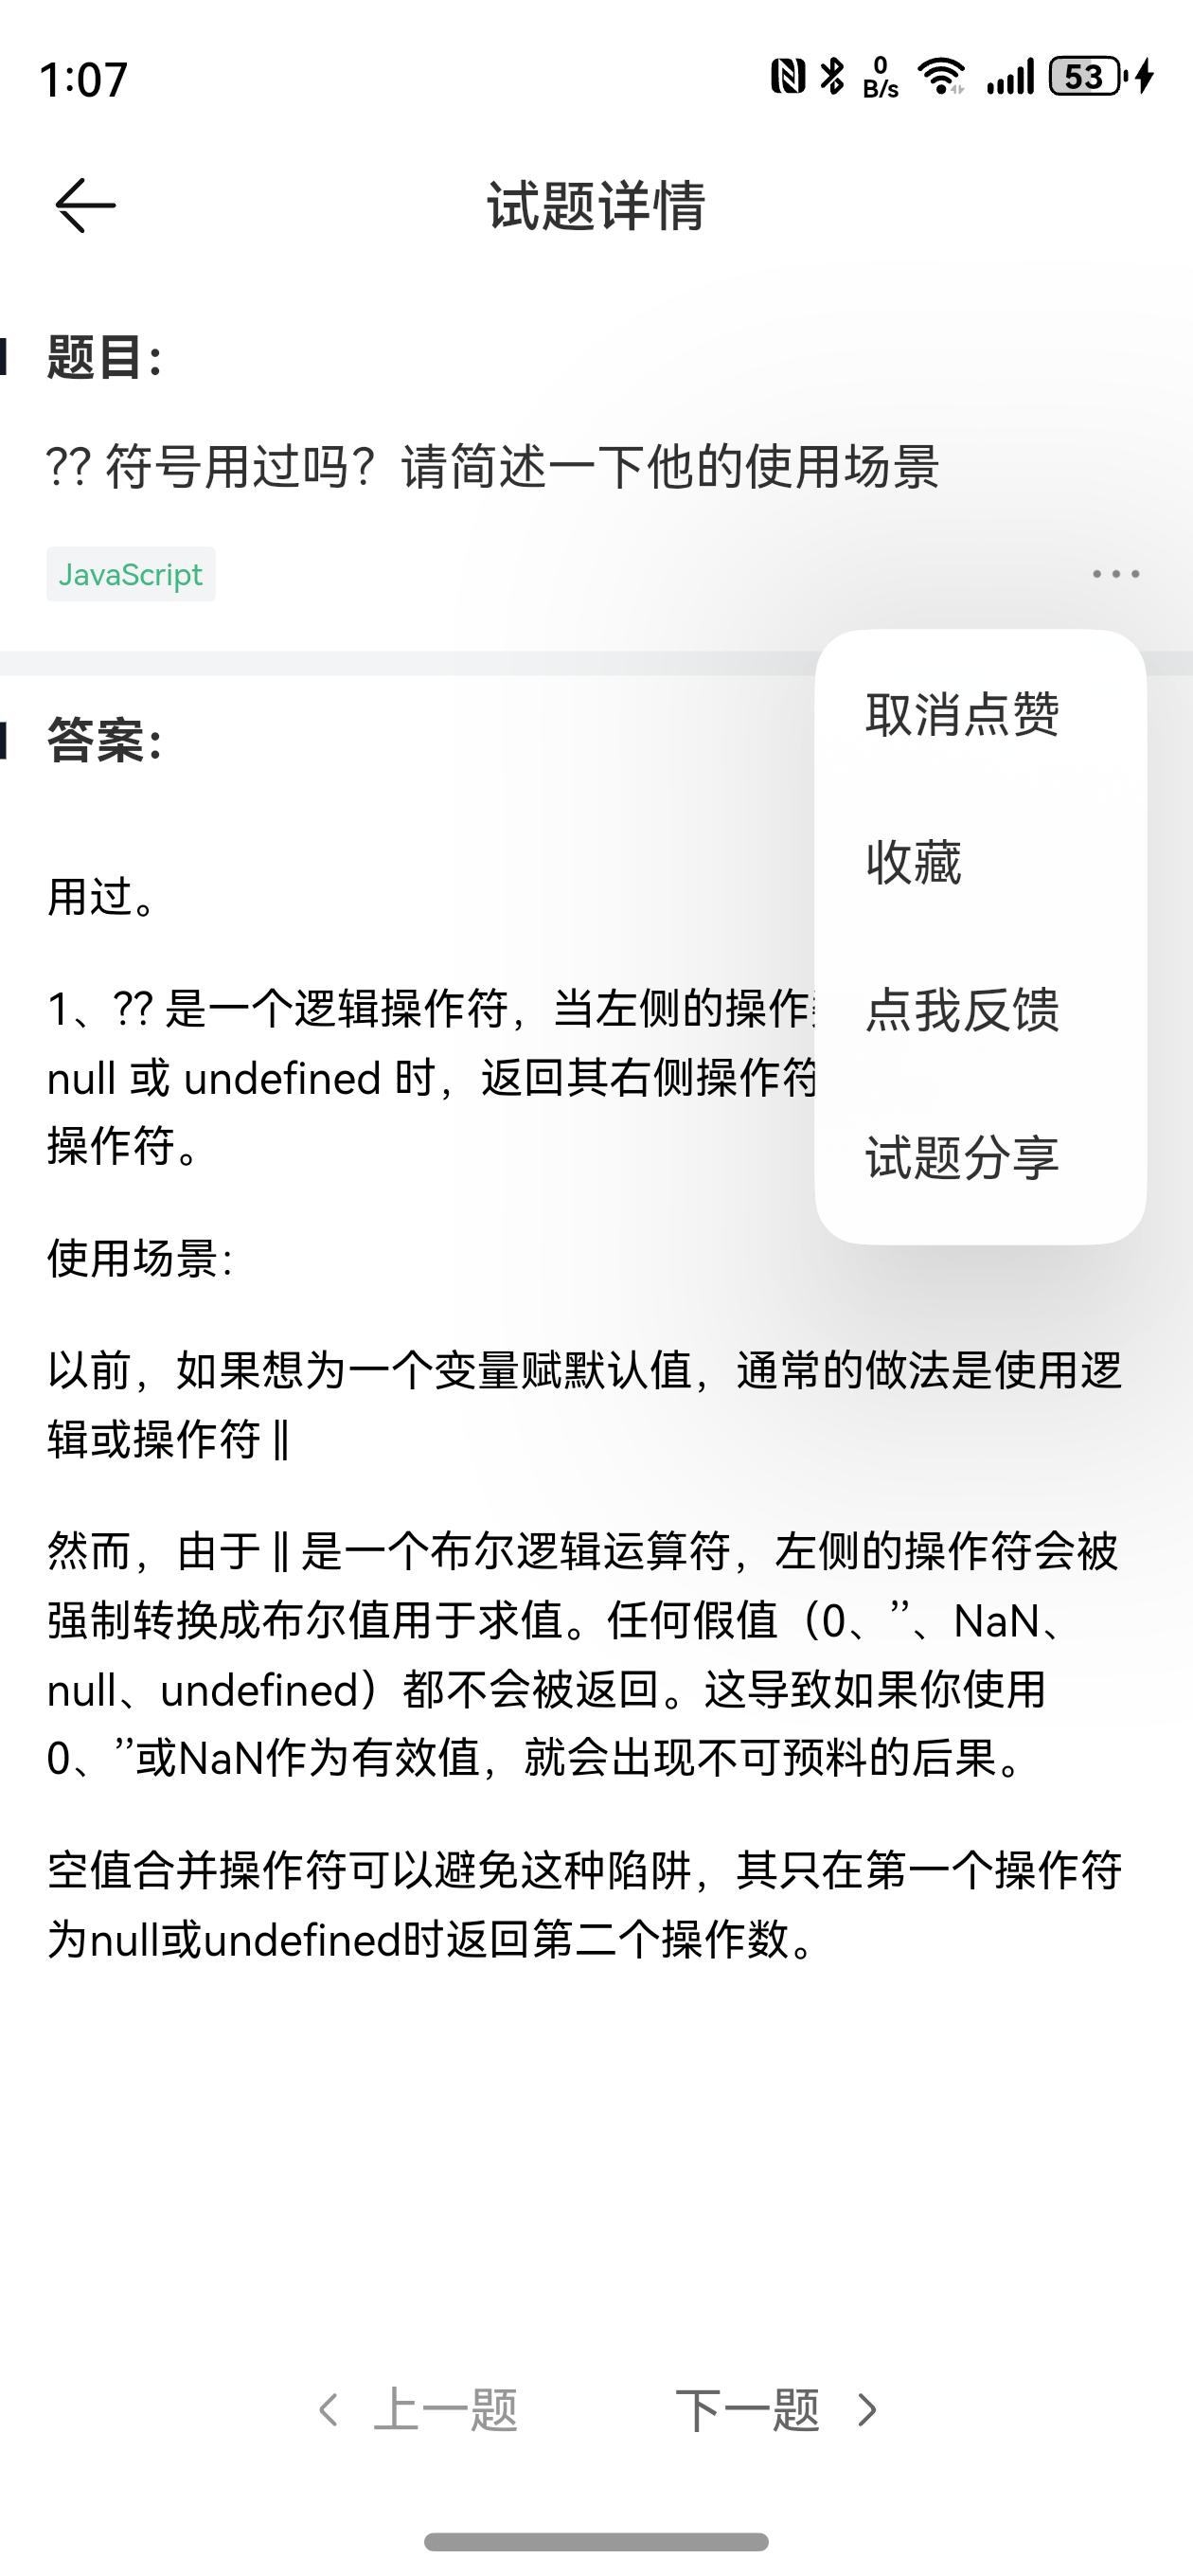
MenuBuilder() {
Menu() {
MenuItem({ content: '点赞' })
MenuItem({ content: '收藏' })
MenuItem({ content: '点我反馈' })
MenuItem({ content: '试题分享' })
}
.width(108)
}
build() {
Column() {
HcNavBar({ title: '试题详情', showRightIcon: false })
// 题目
this.TitleBuilder('题目:')
Text('ArkUI的容器组件有哪些?')
.width('100%')
.padding(16)
.maxLines(2)
.textOverflow({ overflow: TextOverflow.Ellipsis })
Row({ space: 12 }) {
HcTag({ text: 'HarmonyOS' })
HcTag({ text: 'ArkTS', color: '#ff6600' })
Blank()
Image($r("app.media.ic_home_more"))
.width(20)
.aspectRatio(1)
.bindMenu(this.MenuBuilder())
}
.width('100%')
.padding({ bottom: 16, left: 16, right: 16 })
Divider()
.strokeWidth(8)
.color($r('app.color.common_gray_bg'))
// 内容
this.TitleBuilder('答案:')
Text('我是答案')
.layoutWeight(1)
.padding(16)
Row({ space: 80 }) {
Row() {
Image($r('sys.media.ohos_ic_public_arrow_left'))
.width(20)
.aspectRatio(1)
.fillColor($r('app.color.common_gray_01'))
Text(' 上一题')
.fontColor($r('app.color.common_gray_01'))
}
Row() {
Text('下一题 ')
.fontColor($r('app.color.common_gray_03'))
Image($r('sys.media.ohos_ic_public_arrow_right'))
.width(20)
.aspectRatio(1)
.fillColor($r('app.color.common_gray_03'))
}
}
.height(44)
.width('100%')
.justifyContent(FlexAlign.Center)
}
.width('100%')
.height('100%')
.padding({ bottom: this.bottomHeight })
}
}数据渲染
目标:获取试题详细信息并进行渲染
实现步骤:
- 定义试题详情数据类型
- 把试题列表的试题数据通过路由传递到试题详情组件先展示
- 封装一个获取试题详情方法,组件初始化时候调用
落地代码:
1)定义试题详情数据类型 models/index.ets
export interface QuestionDetail extends QuestionItem {
  /* 答案 */
  answer: string;
  /* 是否收藏 */
  collectFlag: 0 | 1;
  /* 是否点赞 */
  likeFlag: 0 | 1;
  /* 所属模块 */
  stage: string[];
}
2)把试题列表的试题数据通过路由传递到试题详情组件先展示 models/index.ets
export interface QuestionPageParams {
  item: QuestionItem;
}
QuestionListComp.ets
 QuestionItemComp({
    item: item
  })
    .onClick(() => {
      auth.checkAuth({
        url: 'pages/QuestionPage',
        params: {
          item
        } as QuestionPageParams
      })
    })
}
QuestionPage.ets
  @State item: QuestionDetail = {} as QuestionDetail

  async aboutToAppear() {
    const params = router.getParams() as QuestionPageParams
    if (params) {
      this.item = params.item as QuestionDetail
    }
  }
3)封装一个获取试题详情方法,组件初始化时候调用
async aboutToAppear() {
const params = router.getParams() as QuestionPageParams
if (params) {
this.item = params.item as QuestionDetail
this.item = await this.getQuestionDetail(this.item.id)
}
}
async getQuestionDetail (id: string) {
const res = await http.request<QuestionDetail>({ url: `question/${id}` })
return res
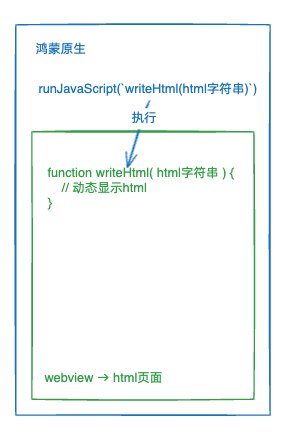
}渲染 HTML 格式答案
目标:基于
Web组件和html页面实现富文本字符串渲染
准备工作:下载 rawfile.zip 解压到项目 rawfile 目录
实现步骤:
- 准备 html 格式的资源,定义一个 JS 函数 (温馨提示:这部分内容混合开发会讲解)
- 通过 Web 组件加载这个页面,加载完毕通过 webview 执行 JS 函数显示内容
落地代码:
controller = new webview.WebviewController();// 内容
this.TitleBuilder("答案:");
Web({ src: $rawfile("question.html"), controller: this.controller })
.width("100%")
.layoutWeight(1)
.onPageEnd(() => {
if (this.item.answer) {
this.controller.runJavaScript(`writeHtml(\`${this.item.answer}\`)`);
}
});数据加载完毕后,再加载下资源触发 onPageEnd 写入答案
      this.item = await this.getQuestionDetail(this.item.id)
+      this.controller.loadUrl($rawfile('question.html'))
自定义 Loading 弹窗
目标:定义一个加载组件,提供给加载试题的时候使用,和后续切换试题使用
实现步骤:
- 准备基础加载结构
- 自定义 Dialog
- 加载数据调用
落地代码:
1)准备基础加载结构 components/HcLoadingDialog.ets
@CustomDialog
export struct HcLoadingDialog {
  controller: CustomDialogController
  @Prop message: string = '加载中...'

  build() {
    Column() {
      Column({ space: 10 }) {
        LoadingProgress()
          .width(48)
          .height(48)
          .color($r('app.color.white'))
        if (this.message) {
          Text(this.message)
            .fontSize(14)
            .fontColor($r('app.color.white'))
        }
      }
      .justifyContent(FlexAlign.Center)
      .width(120)
      .height(120)
      .backgroundColor('rgba(0,0,0,0.6)')
      .borderRadius(16)
    }
  }
}
2)自定义 Dialog 并在 加载前开启 加载完(离开页面也)关闭 QuestionPage.ets
dialog = new CustomDialogController({
  builder: HcLoadingDialog(),
  customStyle: true,
  alignment: DialogAlignment.Center,
}); async getQuestionDetail(id: string) {
this.dialog.open()
const res = await http.request<QuestionDetail>({ url: `question/${id}` })
this.dialog.close()
return res
} onPageHide(): void {
this.dialog.close()
}交互功能
点赞&收藏
目标:实现点赞和取消点赞,收藏和取消收藏
实现分析:
- 点赞和收藏是一个接口,取消点赞和取消收藏是一个接口,参数都一样合并在一个方法完成
- 步骤 1 准备接口参数类型
- 步骤 2 封装操作方法,参数支持 操作类型 + 是点赞|收藏还是取消,根据条件操作
- 步骤 3 绑定事件,调用操作方法
落地代码:
1)参数类型 models/index.ets
export interface QuestionOptParams {
  id: string;
  /* 0 试题  2 面经 */
  type: 0 | 1;
  /* 1 点赞  2 收藏 */
  optType: 1 | 2;
}
2)操作方法 QuestionPage.ets
async questionOpt(optType: 1 | 2, flag: 0 | 1) {
    try {
      const data: QuestionOptParams = {
        id: this.item.id,
        type: 0,
        optType
      }
      // flag 是你要执行的操作 执行 | 取消
      await http.request<null, QuestionOptParams>({
        url: flag === 1 ? 'question/opt' : 'question/unOpt',
        method: 'post',
        data
      })
      if (optType === 1) {
        this.item.likeFlag = flag
        promptAction.showToast({ message: flag ? '点赞成功' : '取消点赞' })
      }
      if (optType === 2) {
        this.item.collectFlag = flag
        promptAction.showToast({ message: flag ? '收藏成功' : '取消收藏' })
      }
    } catch (e) {
      promptAction.showToast({ message: '操作失败' })
    }
  }
3)调用方法 QuestionPage.ets
MenuItem({ content: this.item.likeFlag === 1 ? "取消点赞" : "点赞" }).onClick(() =>
  this.questionOpt(1, this.item.likeFlag === 1 ? 0 : 1)
);
MenuItem({ content: this.item.collectFlag === 1 ? "取消收藏" : "收藏" }).onClick(() =>
  this.questionOpt(2, this.item.collectFlag === 1 ? 0 : 1)
);
上一题下一题
目标:完成上一题下一题的切换效果
实现分析:
- 需要知道下一题上一题的 ID,所以跳转到试题页需要把列表数据传过来
- 切换的时候需要知道当前题索引,才能根据索引找到上一题和下一题的数据,切换到开始和结束需要提示无题
- 列表当中的数据不完整,切换完成的同时需要加载完整的试题数据,并保存到数组,再次切换时候直接获取
落地代码:
1)传列表数据
models/index.ts
export interface QuestionPageParams {
  item: QuestionItem;
  list: QuestionItem[];
}
QuestionListComp.ets
auth.checkAuth({
  url: "pages/QuestionPage",
  params: {
    item,
    list: this.list,
  } as QuestionPageParams,
});
QuestionPage.ets
this.item = params.item as QuestionDetail;
this.list = params.list as QuestionDetail[];
this.item = await this.getQuestionDetail(this.item.id);
2)根据当前题索引切换
@State questionIndex: number = 0this.item = params.item as QuestionDetail;
this.list = params.list as QuestionDetail[];
this.questionIndex = this.list.findIndex((item) => item.id === this.item.id);
this.item = await this.getQuestionDetail(this.item.id); async toggleQuestion (step: number) {
const index = this.questionIndex + step
if (index < 0 || index >= this.list.length) {
return promptAction.showToast({ message: '没有更多题了' })
}
this.questionIndex = index
this.item = this.list[index]
}Row({ space: 80 }) {
Row() {
Image($r('sys.media.ohos_ic_public_arrow_left'))
.width(20)
.aspectRatio(1)
.fillColor(this.questionIndex <= 0 ? $r('app.color.common_gray_01') : $r('app.color.common_gray_03'))
Text(' 上一题')
.fontColor(this.questionIndex <= 0 ? $r('app.color.common_gray_01') : $r('app.color.common_gray_03'))
}
.onClick(() => {
this.toggleQuestion(-1)
})
Row() {
Text('下一题 ')
.fontColor(this.questionIndex >= this.list.length-1 ? $r('app.color.common_gray_01') : $r('app.color.common_gray_03'))
Image($r('sys.media.ohos_ic_public_arrow_right'))
.width(20)
.aspectRatio(1)
.fillColor(this.questionIndex >= this.list.length-1 ? $r('app.color.common_gray_01') : $r('app.color.common_gray_03'))
}
.onClick(() => {
this.toggleQuestion(1)
})
}
.height(44)
.width('100%')
.justifyContent(FlexAlign.Center)3)加载完整试题数据
  async toggleQuestion(step: number) {
    const index = this.questionIndex + step
    if (index < 0 || index >= this.list.length) {
      return promptAction.showToast({ message: '没有更多题了' })
    }
    this.questionIndex = index
    const item= this.list[index]
    // 加载试题,如果数组中已经是完整数据,直接使用,否则加载
    if (item.answer) {
      this.item = item
    } else {
      const fullItem = await this.getQuestionDetail(item.id)
      this.list[index] = fullItem
      this.item = fullItem
    }
    this.controller.runJavaScript(`writeHtml(\`${this.item.answer}\`)`)
  }
默认加载的试题也要放进数组缓存
      this.item = await this.getQuestionDetail(this.item.id)
+      this.list[this.questionIndex] = this.item
      this.controller.loadUrl($rawfile('question.html'))
试题分享
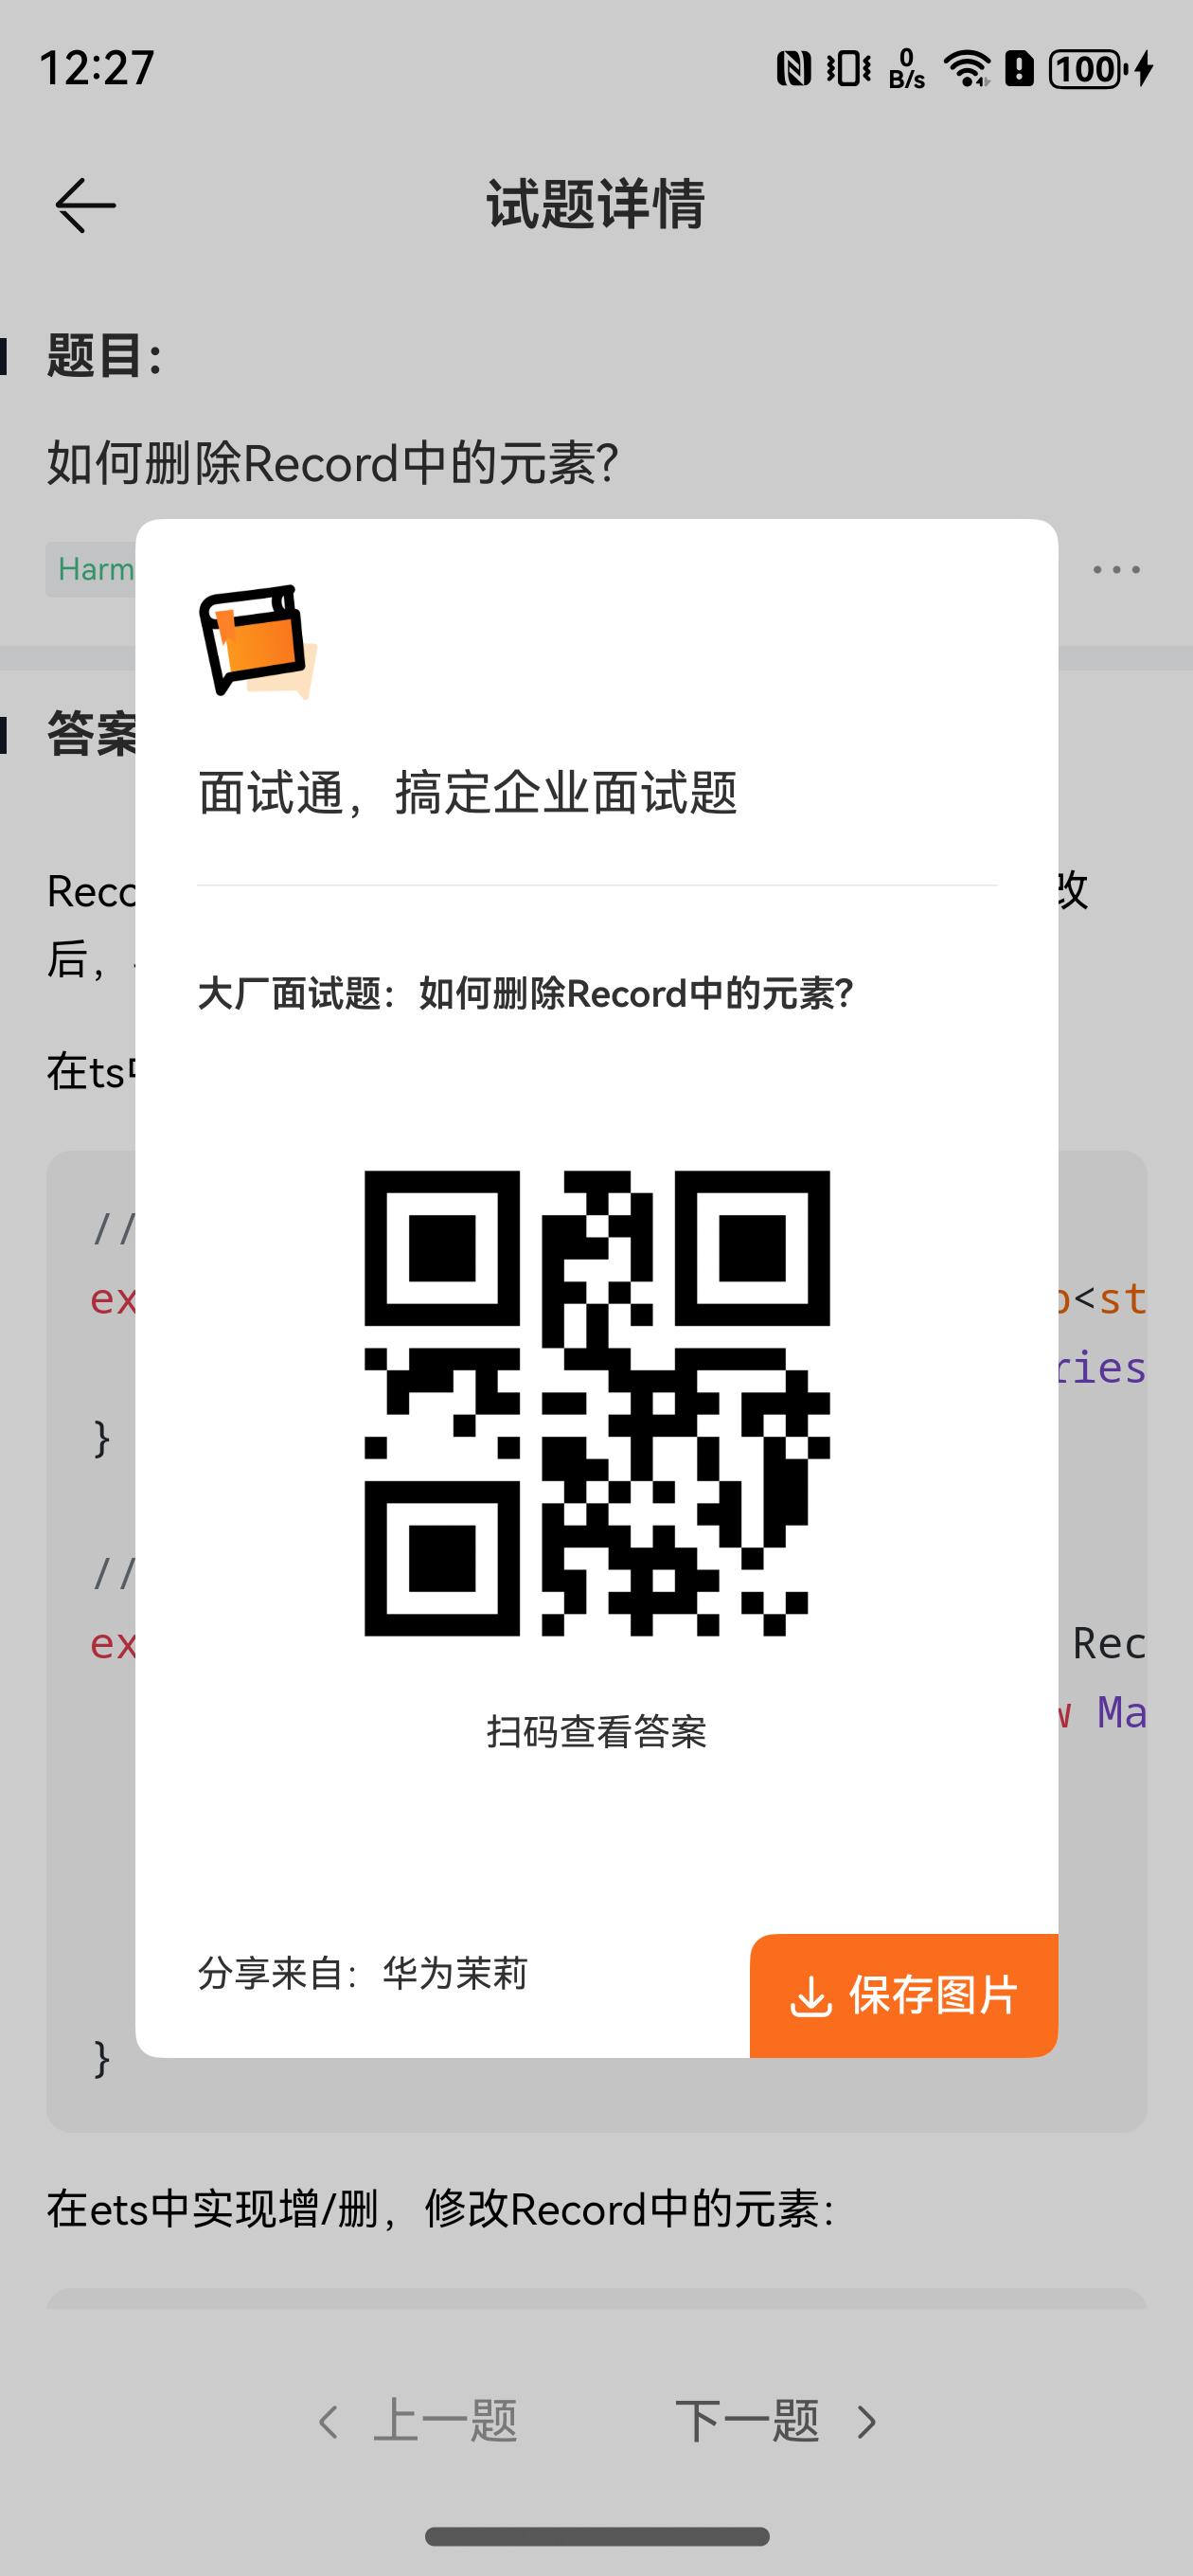
分享弹窗
目的:定义一个分享弹窗组件,点击试题分享打开
会使用到一个二维码组件 QRCode
views/Question/QuestionShareDialog.ets
import { UserStoreKey } from '../../commons/utils/Auth'
import { QuestionDetail, User } from '../../models'

@CustomDialog
export struct QuestionShareDialog {
  @Prop item: QuestionDetail
  @StorageProp(UserStoreKey) user: User = {} as User

  controller: CustomDialogController
  build() {
    Stack({ alignContent: Alignment.BottomEnd }) {
      Column({ space: 20 }) {
        Image($r('app.media.ic_interview_logo'))
          .width(40)
          .height(40)
        Text('面试通,搞定企业面试题')
        Divider()
          .strokeWidth(0.5)
          .color($r('app.color.common_gray_border'))
        Text('大厂面试题:' + this.item.stem)
          .fontSize(12)
          .maxLines(2)
          .fontWeight(600)
          .width('100%')
          .lineHeight(24)
          .textOverflow({ overflow: TextOverflow.Ellipsis })
        QRCode(this.item.id)
          .width(160)
          .height(160)
          .alignSelf(ItemAlign.Center)
        Text('扫码查看答案')
          .fontSize(12)
          .alignSelf(ItemAlign.Center)
        Blank()
        Text('分享来自:' + this.user.nickName || this.user.username)
          .fontSize(12)
      }
      .id('share')
      .padding(20)
      .alignItems(HorizontalAlign.Start)
      .width(300)
      .height(500)
      .backgroundColor($r('app.color.white'))


      Row() {
        Text('保存到本地')
          .fontColor($r('app.color.white'))
          .fontSize(14)
          .padding(12)
          .backgroundColor($r('app.color.common_main_color'))
      }
      .borderRadius({ topLeft: 8 })
      .clip(true)
    }
    .borderRadius(8)
    .clip(true)
  }
}
QuestionPage.ets
shareDialog = new CustomDialogController({
  builder: QuestionShareDialog({ item: this.item }),
  customStyle: true,
  alignment: DialogAlignment.Center,
});MenuItem({ content: "试题分享" }).onClick(() => this.shareDialog.open());组件截图
目标:分享弹窗截图并存储到缓存目录
前置知识:
get(id: string, options?: SnapshotOptions): Promise<image.PixelMap>获取已加载的组件的截图,传入组件的组件标识,找到对应组件进行截图。通过 Promise 返回结果。
packing(source: PixelMap, option: PackingOption): Promise<ArrayBuffer>图片压缩或重新打包,使用 Promise 形式返回结果。
实现步骤:
- 使用
componentSnapShot组件截图,得到 PixelMap 像素图像数据 - 使用
ImagePacker打包 PixelMap 数据,转成二进制 ArrayBuffer 图片数据 - 将 ArrayBuffer 图片数据写入缓存目录,生成图片
落地代码:
  async saveImage () {
    // 进行截图
    const pixelMap = await componentSnapshot.get('share')
    // 图片数据
    const imagePacker = image.createImagePacker()
    const arrayBuffer = await imagePacker.packing(pixelMap, { format: 'image/jpeg', quality: 98 })
    // 存储图片
    const ctx = getContext(this)
    const imagePath = ctx.cacheDir + '/' + Date.now() + '.jpeg'
    const file = fileIo.openSync(imagePath, fileIo.OpenMode.CREATE | fileIo.OpenMode.READ_WRITE)
    fileIo.writeSync(file.fd, arrayBuffer)
    fileIo.closeSync(file.fd)
    promptAction.showToast({ message: '保存成功' })
}Text("保存到本地")
.fontColor($r("app.color.white"))
.fontSize(14)
.padding(12)
.backgroundColor($r("app.color.common_main_color"))
.onClick(() => {
this.saveImage();
});保存到相册
目标:将沙箱缓存目录中的文件保存到相册
前置知识:
photoAccessHelper 该模块提供相册管理模块能力,包括创建相册以及访问、修改相册中的媒体数据信息等。
SaveButton 安全控件的保存控件,用户通过点击该保存按钮,可以临时获取存储权限,而不需要权限弹框授权确认。
实现步骤:
- 使用
photoAccessHelper模块发起资源变更请求,存储图片到相册 - 使用
SaveButton安全组件获取短时权限,进行相册操作
落地代码:
1)存储图片,但是没有权限
  async saveImage () {
    // 进行截图
    const pixelMap = await componentSnapshot.get('share')
    // 图片数据
    const imagePacker = image.createImagePacker()
    const arrayBuffer = await imagePacker.packing(pixelMap, { format: 'image/jpeg', quality: 98 })
    // 存储图片
    const ctx = getContext(this)
    const imagePath = ctx.cacheDir + '/' + Date.now() + '.jpeg'
    const file = fileIo.openSync(imagePath, fileIo.OpenMode.CREATE | fileIo.OpenMode.READ_WRITE)
    fileIo.writeSync(file.fd, arrayBuffer)
    fileIo.closeSync(file.fd)

    const uri = fileUri.getUriFromPath(imagePath)
    const assetChangeRequest = photoAccessHelper.MediaAssetChangeRequest.createImageAssetRequest(ctx, uri)
    const phAccessHelper = photoAccessHelper.getPhotoAccessHelper(ctx)
    await phAccessHelper.applyChanges(assetChangeRequest)
    this.controller.close()

    promptAction.showToast({ message: '保存成功' })
  }
2)使用安全控件
SaveButton({
  icon: SaveIconStyle.FULL_FILLED,
  text: SaveDescription.SAVE_IMAGE,
  buttonType: ButtonType.Normal,
})
  .fontColor($r("app.color.white"))
  .fontSize(14)
  .padding(12)
  .backgroundColor($r("app.color.common_main_color"))
  .onClick((_event, result) => {
    if (result === SaveButtonOnClickResult.SUCCESS) {
      this.saveImage();
    }
  });
扫码看题 📱
目标:实现点击主页扫码按钮,调用扫码能力查看试题
前置知识:
实现步骤:
- 绑定扫码按钮点击提供处理方法,需要判断登录状态
- 使用
scanBarcode.startScanForResult唤起扫码界面进行扫码 - 得到扫码结果,加载试题详情数据,跳转到试题详情页面,不需要在加载数据
落地代码:
1)使用鉴权函数 HomePage.ets
Image($r("app.media.ic_home_scan"))
  .width(24)
  .aspectRatio(1)
  .onClick(() => {
    auth.checkAuth(() => {
      this.scanQuestionCode();
    });
  });
2)调用扫码界面 HomePage.ets
 async scanQuestionCode() {
    if (canIUse('SystemCapability.Multimedia.Scan.ScanBarcode')) {
      const result = await scanBarcode.startScanForResult(getContext(this))
      // TODO 根据ID拿数据跳转
    }
  }
3)加载详情数据,跳转到详情页面
HomePage.ets
  async scanQuestionCode() {
    if (canIUse('SystemCapability.Multimedia.Scan.ScanBarcode')) {
      const result = await scanBarcode.startScanForResult(getContext(this))
      if (result.originalValue) {
        try {
          const item = await http.request<QuestionDetail>({ url: `question/${result.originalValue}` })
          router.pushUrl({
            url: 'pages/QuestionPage',
            params: {
              item,
              list: [item]
            }
          })
        } catch (e) {
          promptAction.showToast({ message: '没有找到试题' })
        }
      }
    }
  }
QuestionPage.ets
  async aboutToAppear() {
    const params = router.getParams() as QuestionPageParams
    if (params) {
      this.item = params.item as QuestionDetail
      this.list = params.list as QuestionDetail[]
      // 如果 item 不是完整数据才加载
      if (!this.item.answer) {
        this.questionIndex = this.list.findIndex(item => item.id === this.item.id)
        this.item = await this.getQuestionDetail(this.item.id)
        this.list[this.questionIndex] = this.item
      }
      this.controller.loadUrl($rawfile('question.html'))
    }
  }
数据埋点
埋点分析
目标:知道此处埋点数据作用,知道学习时间埋点基本实现
埋点概念:
- 埋点是在软件或应用程序的关键位置(如用户操作、事件触发、页面访问等)插入代码,以收集用户行为和应用程序性能数据的技术手段。
学习时间埋点:
- 情况 1:进入试题页记录开始时间,离开试题页,生成一个埋点数据
- 情况 2:进入试题页,切换试题,生成一个埋点数据且记录开始时间...依次类推...离开试题页,生成一个埋点数据
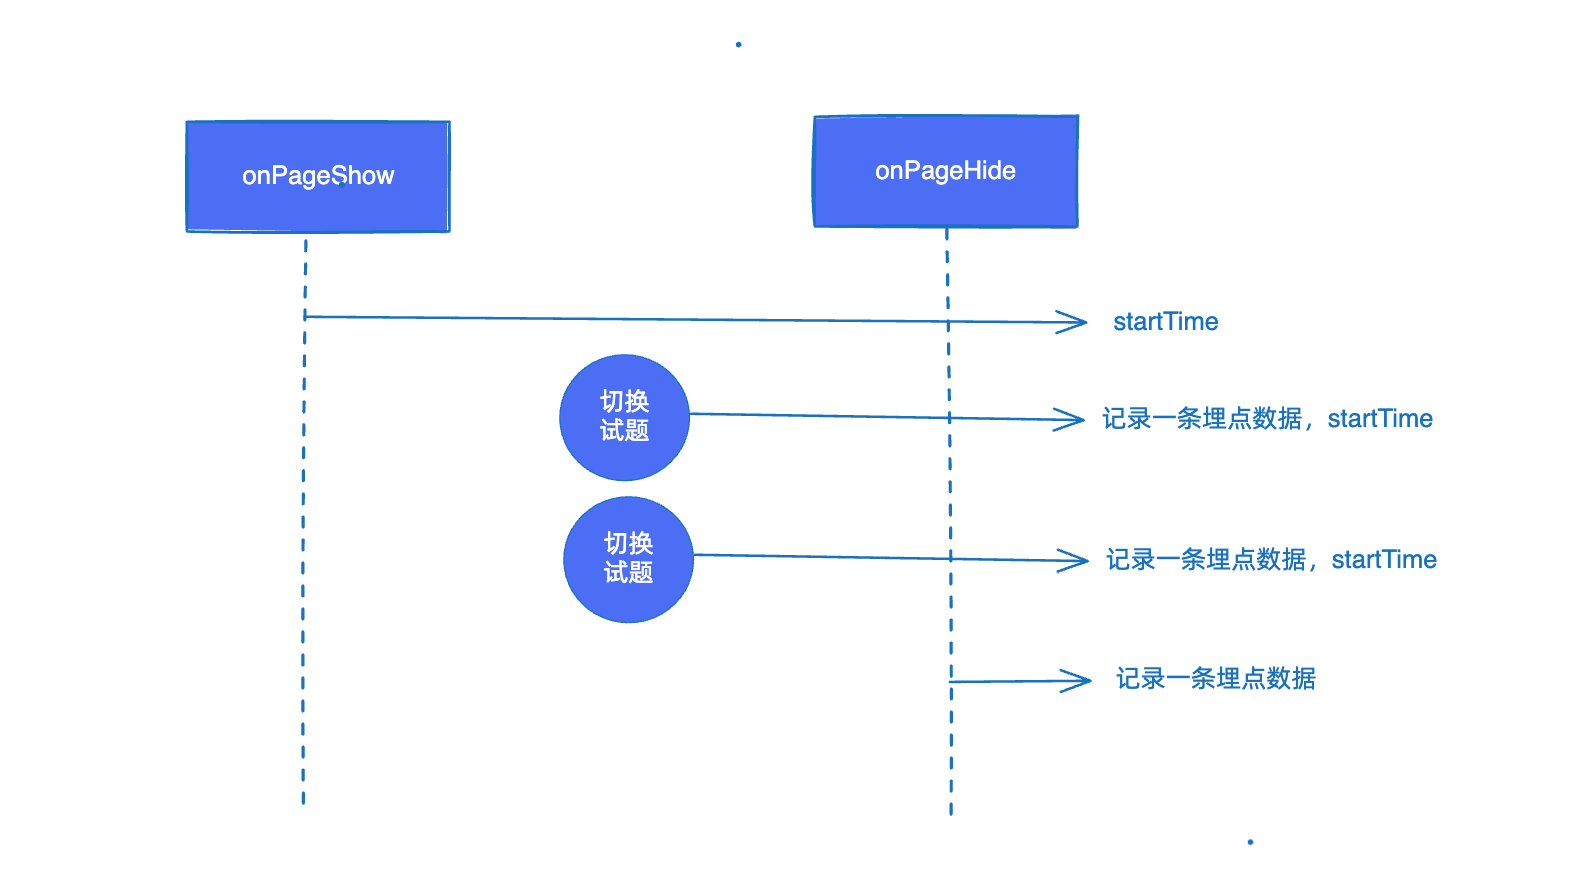
学习时间统计:
- 把记录的数据通过接口提交给后台,后海会统计你的学习时间和每个模块学习进度
埋点工具
目标:封装一个工具,提供记录单条埋点数据,上报埋点数据数组的两个方法
实现步骤:
- 参考接口,定义上报数据类型
- 封装埋点工具
- 使用埋点工具,完成记录和上报(离开页面上报)
落地代码:
1)上报数据类型
models/index.ets
export interface TimeItem {
  questionId: string;
  startTime: number;
  endTime: number;
}
2)工具函数
utils/Tracking.ets
import { TimeItem } from "../../models";
import { http } from "./Http";
import { logger } from "./Logger";

class Tracking {
  list: TimeItem[] = [];

  record(startTime: number, endTime: number, questionId: string) {
    this.list.push({
      startTime,
      endTime,
      questionId,
    });
    logger.debug("Tracking", JSON.stringify(this.list));
  }

  async report() {
    await http.request<null>({ url: "time/tracking", method: "post", data: { timeList: this.list } });
    this.list = [];
  }
}

export const tracking = new Tracking();
3)记录数据,上报数据
QuestionPage.ets
  startTime: number = Date.now()

  onPageShow(): void {
    this.startTime = Date.now()
  }

  onPageHide(): void {
    tracking.record(this.startTime, Date.now(), this.item.id)
    tracking.report()
} async toggleQuestion(step: number) {
const index = this.questionIndex + step
if (index < 0 || index >= this.list.length) {
return promptAction.showToast({ message: '没有更多题了' })
}
+ // 记录学习时间
+ tracking.record(this.startTime, Date.now(), this.item.id)
+ this.startTime = Date.now()温馨提示
- 用户频繁的进出试题详情,这个上报请求会频繁的发送,服务端压力很大怎么优化?
- 可以积累上报数据条数到 N 条后触发上报条件,但是目前数据是在应用内存中,退出或强杀后将销毁。
- 需要记录的同时存储起来,应用启动的时候(或者登录成功的时候)去上报一次
Preferences 首选项
掌握首选项的基本使用
基本概念:
- 用户首选项为应用提供 Key-Value 键值型的数据处理能力,支持应用持久化轻量级数据,并对其修改和查询。
- 数据存储形式为键值对,键的类型为字符串型,值的存储数据类型包括数字型、字符型、布尔型以及这 3 种类型的数组类型。
条件限制:
- Key 键为 string 类型,要求非空且长度不超过 1024 个字节。
- 如果 Value 值为 string 类型,请使用 UTF-8 编码格式,可以为空,不为空时长度不超过 16 _ 1024 _ 1024 个字节。
- 内存会随着存储数据量的增大而增大,所以存储的数据量应该是轻量级的,建议存储的数据不超过一万条,否则会在内存方面产生较大的开销。
使用示例:
1)获取首选项实例
import { preferences } from "@kit.ArkData";

const options: preferences.Options = { name: "myStore" };
const dataPreferences = preferences.getPreferencesSync(context, options);
2)写入|修改,并持久化
dataPreferences.putSync("startup", "auto");
dataPreferences.flush();
3)读取
dataPreferences.getSync("startup");4)删除,并持久化
dataPreferences.deleteSync("startup");
dataPreferences.flush();
5)删除实例
preferences.deletePreferences(context, options);上报优化
目标:实现埋点数据持久化,实现 5 条数据以上进行上报,实现应用启动(登录后)上报
实现步骤:
- 使用 preferences 记录的时候存储数据
- 在上报的时候判断 5 条以上发请求
- 实现应用启动(登录后)上报
落地代码:
Tracking.ets 工具函数改造
import { TimeItem } from "../../models";
import { http } from "./Http";
import { preferences } from "@kit.ArkData";
import { JSON } from "@kit.ArkTS";
class Tracking {
store: preferences.Preferences | null = null;
dataKey: string = "time-list";
getStore() {
if (!this.store) {
const context = AppStorage.get<Context>("context");
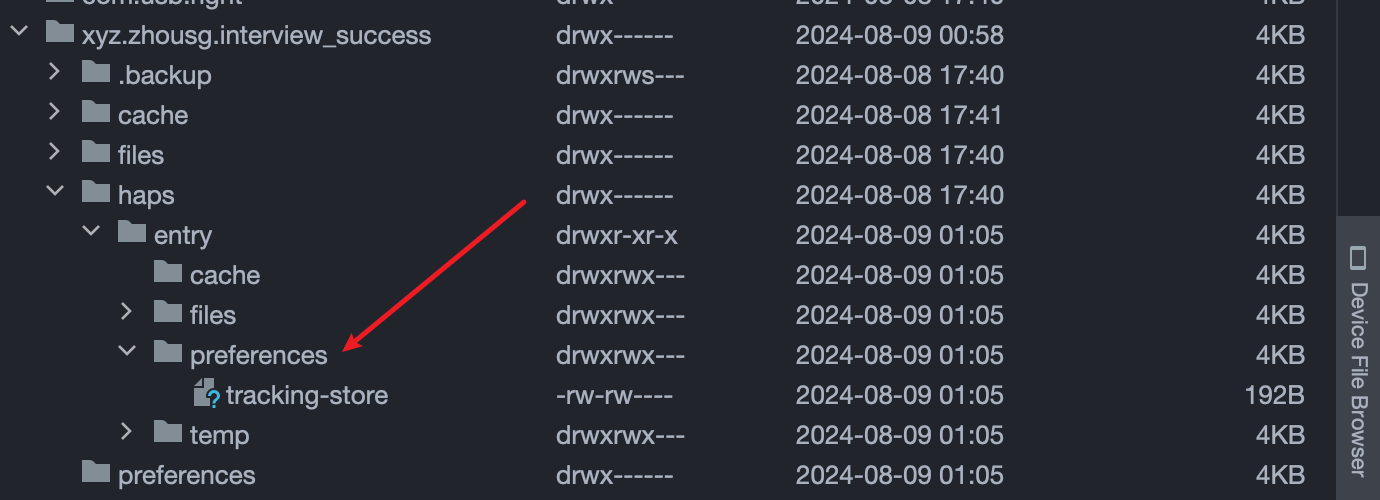
const dataPreferences = preferences.getPreferencesSync(context, { name: "tracking-store" });
this.store = dataPreferences;
}
return this.store;
}
async record(startTime: number, endTime: number, questionId: string) {
const json = this.getStore().getSync(this.dataKey, "[]");
const list = JSON.parse(json as string) as TimeItem[];
list.push({ startTime, endTime, questionId });
this.getStore().putSync(this.dataKey, JSON.stringify(list));
await this.getStore().flush();
}
async report(force: boolean = false) {
const json = this.getStore().getSync(this.dataKey, "[]");
const list = JSON.parse(json as string) as TimeItem[];
if (list.length >= 5 || (force && list.length)) {
await http.request<null>({ url: "time/tracking", method: "post", data: { timeList: list } });
this.getStore().deleteSync(this.dataKey);
await this.getStore().flush();
}
}
}
export const tracking = new Tracking();HomePage.ets 主动上报
  aboutToAppear(): void {
    tracking.report(true)
  }
LoginPage.ets 主动上报
      auth.setUser(user)
      emitter.emit(LOGIN_EVENT)
+      tracking.report(true)
试题搜索
搜索页面
搜索页面:pages/SearchPage.ets
import { SearchHistory } from '../views/Search/SeachHistory'
import { router } from '@kit.ArkUI'
import { QuestionListComp } from '../commons/components'

@Entry
@Component
struct SearchPage {
  @StorageProp('topHeight') topHeight: number = 0
  @State keyword: string = ''
  @State isSearch: boolean = false

  build() {
    Column() {
      Row({ space: 16 }) {
        Search({ placeholder: '请输入试题关键字', value: this.keyword })
          .placeholderFont({ size: 14 })
          .height(32)
          .layoutWeight(1)
          .defaultFocus(true)
        Text('取消')
          .fontColor($r('app.color.black'))
          .fontSize(15)
          .fontWeight(500)
          .onClick(() => router.back())
      }
      .height(64)
      .padding({ left: 16, right: 16 })
      .border({ width: { bottom: 0.5 }, color: $r('app.color.common_gray_border') })

      Column() {
        if (this.isSearch) {
          // TODO 试题列表
        } else {
          SearchHistory({
            onSearch: keyword => {
              // TODO 进行搜索
            }
          })
        }
      }
      .layoutWeight(1)
    }
    .padding({ top: this.topHeight })
    .width('100%')
    .height('100%')
  }
}搜索历史:views/SearchHistory.ets
interface BtnItem {
  text: string
  onClick?: () => void
}

@Component
export struct SearchHistory {
  @State isDeleting: boolean = false
  @State keywords: string[] = []
  onSearch: (val: string) => void = () => {
  }

  aboutToAppear(): void {
    this.keywords = ['HarmonyOS', 'ArkUI', '大厂', 'Component', 'ArkTS']
  }

  build() {
    // 搜索历史
    Flex({ direction: FlexDirection.Row, wrap: FlexWrap.Wrap }) {
      Row() {
        Text('搜索记录')
          .fontSize(15)
          .fontColor($r('app.color.common_gray_01'))
        Blank()
        if (this.isDeleting) {
          Text() {
            Span('全部删除')
              .onClick(() => {
                // TODO 删除全部
              })
            Span(' | ')
            Span('完成')
              .onClick(() => {
                this.isDeleting = false
              })
          }
          .fontSize(14)
          .fontColor($r('app.color.common_gray_01'))
        } else {
          Image($r('app.media.ic_public_delete'))
            .width(16)
            .aspectRatio(1)
            .fillColor($r('app.color.common_gray_01'))
            .onClick(() => {
              this.isDeleting = true
            })
        }
      }
      .width('100%')

      ForEach(this.keywords, (keyword: string) => {
        Row({ space: 8 }) {
          Text(keyword)
            .fontSize(14)
            .fontColor('#6F6F6F')
          if (this.isDeleting) {
            Image($r('app.media.ic_public_close'))
              .width(12)
              .aspectRatio(1)
              .fillColor('#878787')
              .onClick(() => {
                // TODO 删除单个
              })
          }
        }
        .padding({ left: 12, right: 12 })
        .height(32)
        .backgroundColor('#f3f4f5')
        .borderRadius(16)
        .margin({ right: 16, top: 16 })
        .onClick(() => {
          if (!this.isDeleting) {
            // 非编辑态才可点击搜索
            this.onSearch(keyword)
          }
        })
      })
    }
    .padding(16)
  }
}
实现搜索
目标:实现根据关键字查询试题列表
实现步骤:
- 需要复用
QuestionListComp.ets组件,组件支持keywordProp 来查询试题 - 输入内容后,点击虚拟键盘搜索按钮进行搜索,页面展示列表
- 修改内容后,更新关键字数据,判断是否删除完毕,页面展示历史
落地代码:
1)改造 试题列表 组件
models/index.ets 添加一个字段
export interface QuestionListParams {
  type: number
  questionBankType: 9 | 10
  sort?: SortType
  page?: number
  pageSize?: number,
  keyword?: string
}
QuestionListComp.ets 支持 keyword 查询
  // 试题ID
  @Prop typeId: number
+ @Prop keyword: string = ''getQuestionList(): Promise<PageData<QuestionItem>> {
return http.request<PageData<QuestionItem>>({
url: 'question/list',
params: {
type: this.typeId,
+ keyword: this.keyword,
questionBankType: 10,
sort: this.sort,
page: this.page,
pageSize: 10
} as QuestionListParams
})
}SearchPage.ets 使用试题列表组件
        if (this.isSearch) {
          // 试题列表
          QuestionListComp({
            keyword: this.keyword
          })
        } else {
2)实现搜索
          .onSubmit(value => {
            this.keyword = value
            if (this.keyword) {
              this.isSearch = true
            }
          })
3)删除内容,页面展示历史
          .onChange(value => {
            this.keyword = value
            if (!value) {
              this.isSearch = false
            }
          })
搜索历史工具
目标:基于首选项封装搜索历史存储工具
前置知识:
- 首选项 API:
clearSync()清理首选项实例所有数据 - 首选项 API:
getAllSync()获取首选项实例所有数据
实现步骤:
- 封装一个工具类,提供获取历史首选项实例方法
- 提供 存储单条历史,删除单条历史,获取所有历史,情况所有历史 方法
落地代码:utils/History.ets
import { preferences } from "@kit.ArkData";

class History {
  store: preferences.Preferences | null = null;

  getStore() {
    if (!this.store) {
      const context = AppStorage.get<Context>("context");
      this.store = preferences.getPreferencesSync(context, { name: "history-store" });
    }
    return this.store;
  }

  async setItem(keyword: string) {
    this.getStore().putSync(keyword, keyword);
    await this.getStore().flush();
  }

  async delItem(keyword: string) {
    this.getStore().deleteSync(keyword);
    this.getStore().flush();
  }

  async clear() {
    this.getStore().clearSync();
    await this.getStore().flush();
  }

  getAll() {
    const obj = this.getStore().getAllSync();
    return Object.keys(obj);
  }
}

export const history = new History();
搜索历史功能
目标:实现记录历史,删除历史,清空历史,展示历史功能,实现点击历史进行搜索功能
实现步骤:
- 搜索存储历史
- 展示历史,删除单个,删除全部
- 3)点击历史搜索
落地代码:
1)搜索存储历史 SearchPage.ets
          .onSubmit((value) => {
            this.keyword = value
            if (this.keyword) {
              this.isSearch = true
              history.setItem(value)
            }
          })
2)展示历史,删除单个,删除全部 SearchHistory.ets
  aboutToAppear(): void {
    this.keywords = history.getAll()
}Span("全部删除").onClick(() => {
history.clear();
this.keywords = history.getAll();
});Image($r("app.media.ic_public_close"))
.width(12)
.aspectRatio(1)
.fillColor("#878787")
.onClick(() => {
history.delItem(keyword);
this.keywords = history.getAll();
});3)点击历史搜索 SearchPage.ets
SearchHistory({
  onSearch: (keyword) => {
    this.keyword = keyword;
    this.isSearch = true;
  },
});