设置模块
编辑资料
个人设置页面
import { router } from '@kit.ArkUI';
import { HcNavBar } from '../commons/components';
import { auth } from '../commons/utils/Auth';
import { User } from '../models';

export interface Tool {
  icon?: ResourceStr
  name: string
  value?: string
  onClick?: () => void,
  radius?: 0 | 1 | 2
}

@Entry
@Component
struct SettingsPage {
  @Builder
  toolsBuilder(tool: Tool) {
    Row() {
      if (tool.icon) {
        Image(tool.icon)
          .width(16)
          .aspectRatio(1)
          .margin({ right: 12 })
      }
      Text(tool.name)
        .fontSize(16)
      Blank()
      if (tool.value) {
        Text(tool.value)
          .fontSize(14)
          .fontColor($r('app.color.common_gray_01'))
          .margin({ right: 10 })
      }
      Image($r('sys.media.ohos_ic_public_arrow_right'))
        .width(18)
        .aspectRatio(1)
        .fillColor($r('app.color.common_gray_01'))
    }
    .height(50)
    .width('100%')
    .backgroundColor($r('app.color.white'))
    .padding({ left: 16, right: 10 })
    .borderRadius({
      topLeft: tool.radius === 1 ? 8 : 0,
      topRight: tool.radius === 1 ? 8 : 0,
      bottomLeft: tool.radius === 2 ? 8 : 0,
      bottomRight: tool.radius === 2 ? 8 : 0
    })
    .onClick(() => {
      tool.onClick && tool.onClick()
    })
  }

  build() {
    Column() {
      HcNavBar({ title: '设置', showRightIcon: false, showBorder: true })
      Column({ space: 0.5 }) {
        Blank()
          .height(15)
        this.toolsBuilder({
          name: '编辑资料', radius: 1, onClick: () => {
            auth.checkAuth({
              url: 'pages/ProfilePage'
            })
          }
        })
        this.toolsBuilder({ name: '账号设置', radius: 2 })
        Blank()
          .height(15)
        this.toolsBuilder({ name: '消息推送', radius: 1 })
        this.toolsBuilder({
          name: '深色模式',
          value: '已关闭',
          radius: 1,
          onClick: () => {
            // TODO 设置主题
          }
        })
        this.toolsBuilder({
          name: '清除应用缓存', value: '10MB', onClick: () => {
            // TODO 清除缓存
          }
        })
        this.toolsBuilder({ name: '当前版本', value: '1.0.0', radius: 2 })
        Blank()
          .height(15)
        Text('退出账号')
          .height(50)
          .fontColor($r('app.color.common_main_color'))
          .opacity(0.6)
          .onClick(async () => {
            auth.setUser({} as User)
            router.back()
          })
      }
      .layoutWeight(1)
      .padding({ right: 15, left: 15 })
      .backgroundColor($r('app.color.common_gray_bg'))
    }
  }
}
编辑资料页面
import { UserStoreKey } from '../commons/utils'
import { User } from '../models'
import { HcLoadingDialog, HcNavBar } from '../commons/components'

@Entry
@Component
struct ProfilePage {
  @StorageProp(UserStoreKey) user: User = {} as User
  dialog: CustomDialogController = new CustomDialogController({
    builder: HcLoadingDialog({ message: '更新中...' }),
    customStyle: true,
    alignment: DialogAlignment.Center
  })

  build() {
    Column() {
      HcNavBar({ title: '编辑资料', showRightIcon: false })
      List() {
        ListItem() {
          Row() {
            Text('头像')
            Image(this.user.avatar || $r('app.media.ic_mine_avatar'))
              .alt($r('app.media.ic_mine_avatar'))
              .width(40)
              .aspectRatio(1)
              .borderRadius(20)
              .border({ width: 0.5, color: $r('app.color.common_gray_border') })
              .onClick(() => {
                // TODO 更新头像
              })
          }
          .width('100%')
          .height(60)
          .justifyContent(FlexAlign.SpaceBetween)
        }

        ListItem() {
          Row() {
            Text('昵称')
            TextInput({ text: this.user.nickName })
              .fontColor($r('app.color.common_gray_03'))
              .textAlign(TextAlign.End)
              .layoutWeight(1)
              .padding(0)
              .height(60)
              .backgroundColor($r('app.color.white'))
              .borderRadius(0)
              .onChange((value) => this.user.nickName = value)
              .onSubmit(() => {
                // TODO 更新昵称
              })
          }
          .width('100%')
          .justifyContent(FlexAlign.SpaceBetween)
        }
      }
      .width('100%')
      .height('100%')
      .padding({
        left: 35,
        right: 35,
        top: 15,
        bottom: 15
      })
      .divider({ strokeWidth: 0.5, color: $r('app.color.common_gray_bg') })
    }
  }
}
编辑昵称
目标:输入昵称后,虚拟键盘确认,完成昵称修改
1)绑定确认事件
            TextInput({ text: this.user.nickName })
              // ...
              .onSubmit(() => {
                this.updateNickName()
              })
2)提交请求更新User
async updateNickName() {
    await http.request<User, User>({
      url: 'userInfo/profile',
      method: 'post',
      data: {
        nickName: this.user.nickName
      } as User
    })
    promptAction.showToast({ message: '更新昵称成功' })
    auth.setUser(this.user)
  }
编辑头像
目标:选择相册图片更新用户头像
前置知识:
- photoAccessHelper.Photoviewpicker 图库选择器对象,用来支撑选择图片/视频等用户场景。在使用前,需要先创建PhotoViewPicker实例。
1)打开相册选择图片
async updateAvatar() {
    // 1. 选择相册照片
    // 选择照片配置
    const photoSelectOptions = new photoAccessHelper.PhotoSelectOptions()
    photoSelectOptions.MIMEType = photoAccessHelper.PhotoViewMIMETypes.IMAGE_TYPE
    photoSelectOptions.maxSelectNumber = 1
    // 选择照片对象
    const photoPicker = new photoAccessHelper.PhotoViewPicker()
    const photoResult = await photoPicker.select(photoSelectOptions)
    const uri = photoResult.photoUris[0]

  }
2)存储图片到应用沙箱
    this.dialog.open()
    // 2. 拷贝选择的图片到应用沙箱
    const file = fileIo.openSync(uri, fileIo.OpenMode.READ_ONLY)
    const filePath = getContext(this).cacheDir + '/' + file.name
    fileIo.copyFileSync(file.fd, filePath)
    fileIo.closeSync(file.fd)
    const formData = new FormData()
    formData.append('file', `internal://cache/${file.name}`)
3)提交更新头像请求
// 3. 提交数据
    const url = await http.request<string>({
      url: 'userInfo/avatar',
      method: 'post',
      data: formData,
      headers: { 'Content-Type': 'multipart/form-data' },
      context: getContext(this)
    })
    const user = await http.request<User>({ url: 'userInfo' })
    this.user.avatar = user.avatar
    auth.setUser(this.user)
    promptAction.showToast({ message: '更新头像成功' })
    this.dialog.close()
压缩图片
目的:上传之前压缩图片,提高网络通信效率
      // 2. 拷贝选择的图片到应用沙箱,并压缩
      const originFile = fileIo.openSync(uri, fileIo.OpenMode.READ_ONLY)
      // const filePath = getContext(this).cacheDir + '/' + file.name
      // fileIo.copyFileSync(file.fd, filePath)
      // fileIo.closeSync(file.fd)
      // 压缩
      const imageSource = image.createImageSource(originFile.fd)
      const imagePacker = image.createImagePacker()
      const arrayBuffer = await imagePacker.packing(imageSource, { format: "image/jpeg", quality: 70})
      const newFilePath = getContext(this).cacheDir + '/' + Date.now() + '.jpg'
      const newFile = fileIo.openSync(newFilePath, fileIo.OpenMode.CREATE | fileIo.OpenMode.READ_WRITE)
      fileIo.writeSync(newFile.fd, arrayBuffer)
      logger.debug('size', fileIo.statSync(newFile.fd).size.toString())
      fileIo.closeSync(newFile.fd)

      const formData = new FormData()
      formData.append('file', `internal://cache/${newFile.name}`)
深色模式
深色模式资源
目标:根据默认的主题颜色,配置暗色主题的颜色资源
具体步骤:
- 添加暗黑模式下的演示资源, 默认是跟随系统可以测试
落地代码:
1)添加暗黑模式下的演示资源 resources/dark/element/color.json 添加以下代码
{
"name": "common_gray_01",
"value": "#979797"
},
{
"name": "common_gray_02",
"value": "#848484"
},
{
"name": "common_gray_03",
"value": "#666666"
},
{
"name": "common_gray_bg",
"value": "#232323"
},
{
"name": "common_gray_border",
"value": "#323232"
},
{
"name": "common_main_color",
"value": "#FA6D1D"
},
{
"name": "common_green",
"value": "#41B883"
},
{
"name": "common_blue",
"value": "#3266EE"
},
{
"name": "common_blue_bg",
"value": "#EDF2FF"
},
{
"name": "black",
"value": "#ffffff"
},
{
"name": "white",
"value": "#131313"
},
{
"name": "home_gray",
"value": "#b3b3cc"
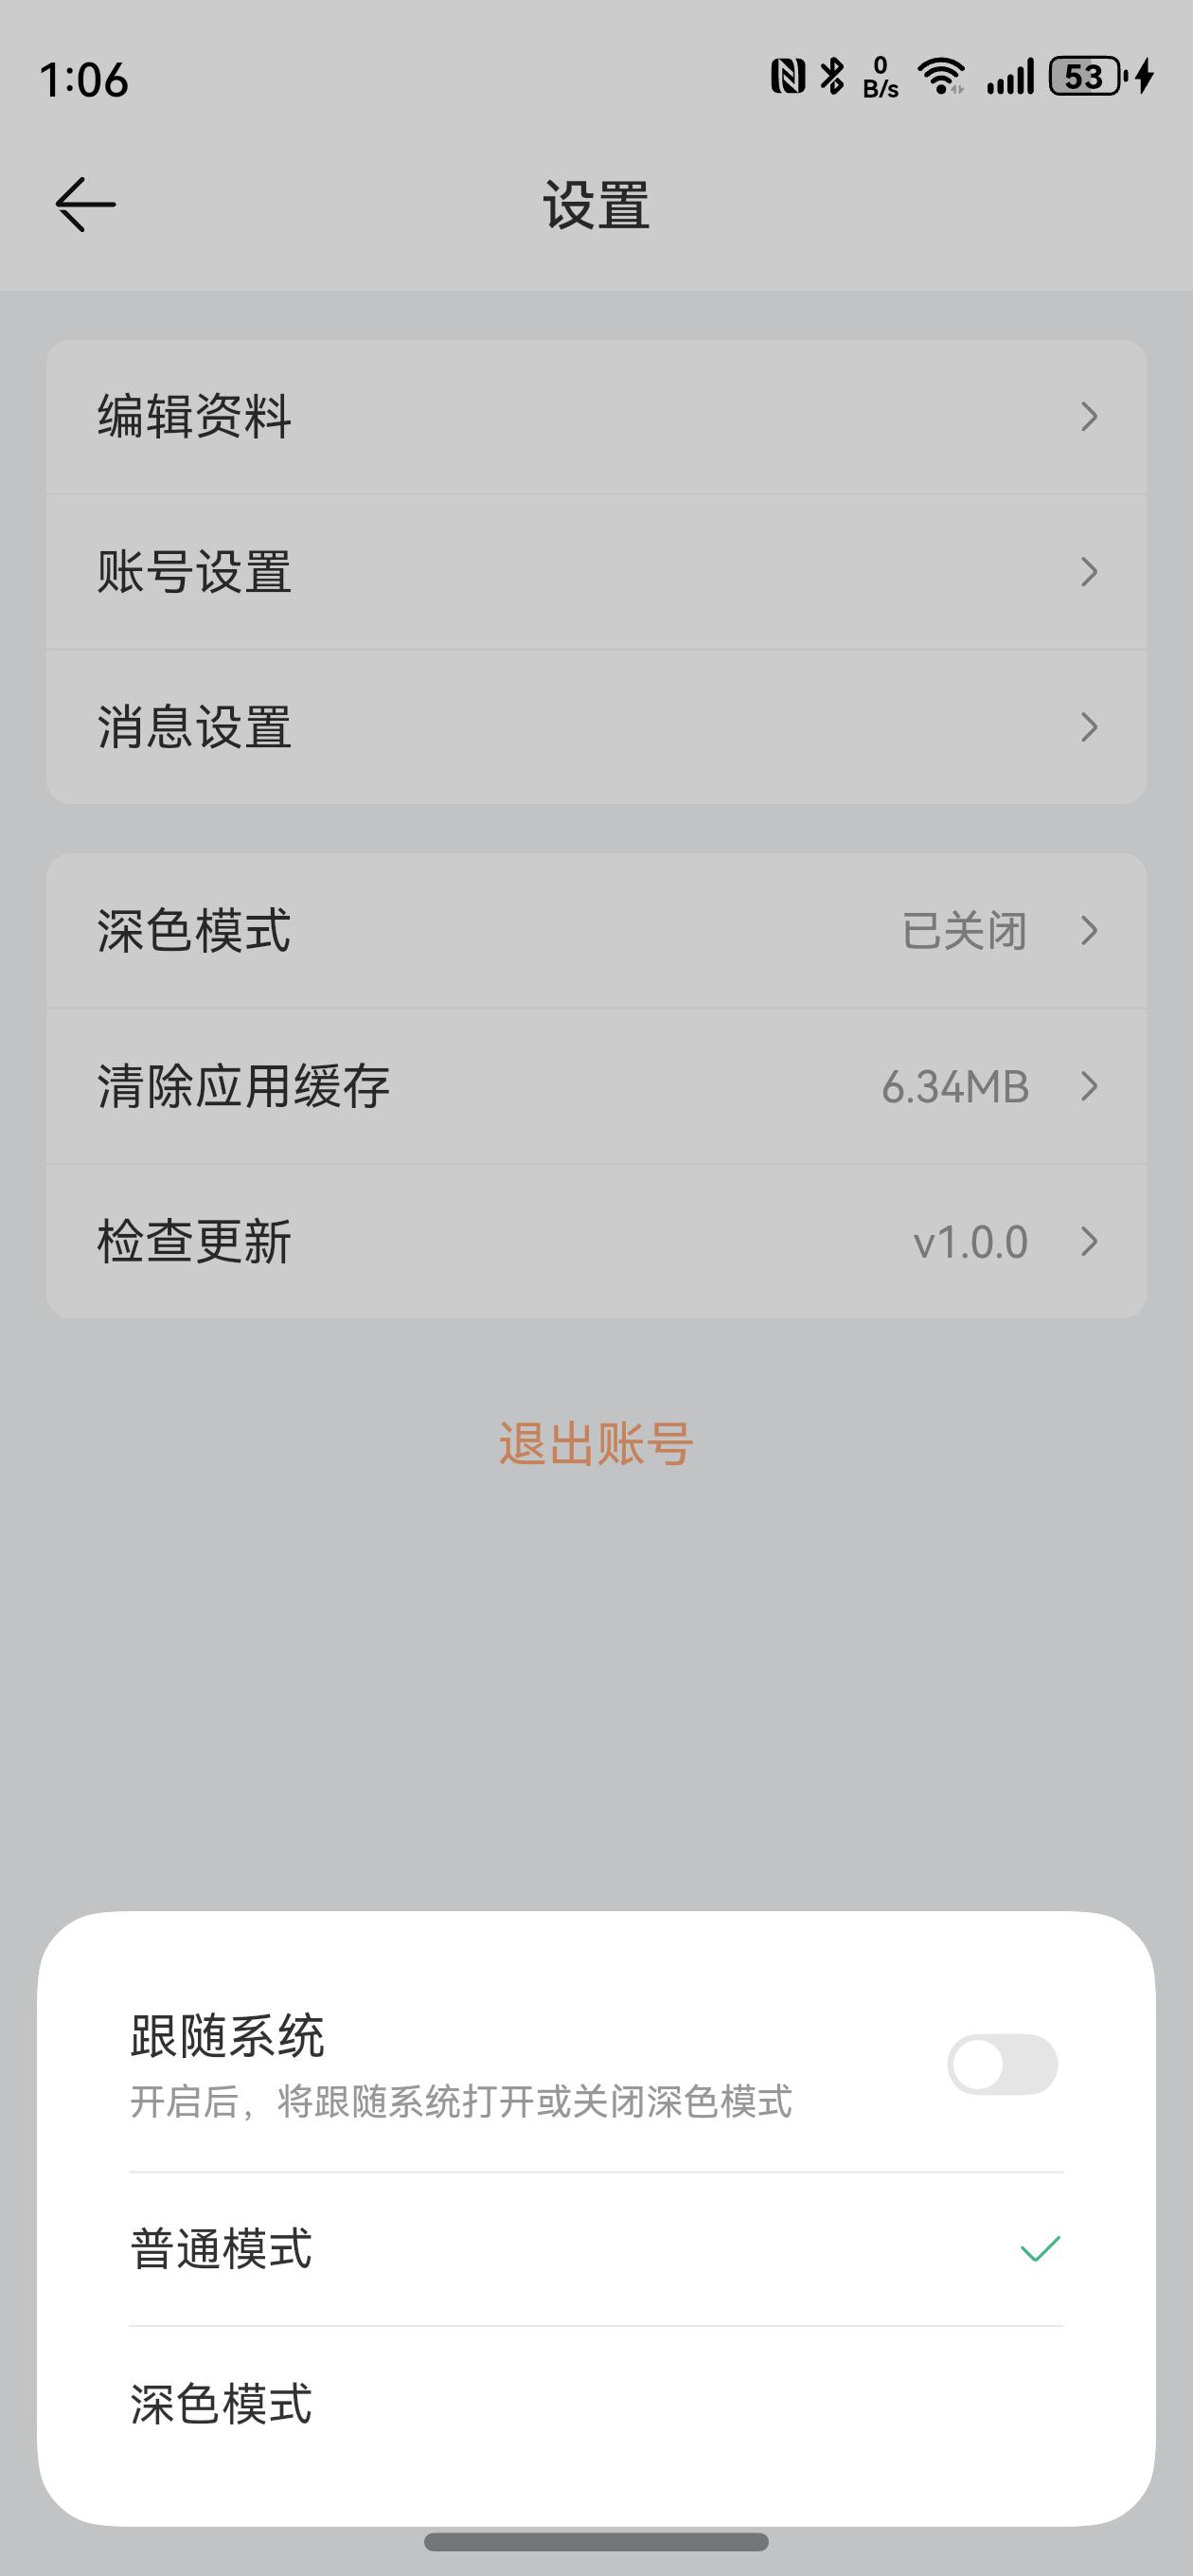
}切换对话框
目标:准备设置应用主题颜色的对话框
1)准备对话框
views/Settings/SettingsThemeDialog.ets
@CustomDialog
export struct SettingsThemeDialog {
controller: CustomDialogController
build() {
Column() {
Row() {
Column({ space: 4 }) {
Text('跟随系统')
Text('开启后,将跟随系统打开或关闭深色模式')
.fontSize(12)
.fontColor($r('app.color.common_gray_01'))
}
.alignItems(HorizontalAlign.Start)
Toggle({
type: ToggleType.Switch,
isOn: true
})
.onChange((val) => {
if (val) {
// TODO 跟随系统
} else {
// TODO 默认亮色
}
})
}
.width('100%')
.height(70)
.justifyContent(FlexAlign.SpaceBetween)
.border({ width: { bottom: 0.5 }, color: $r('app.color.common_gray_border') })
Row() {
Text('普通模式')
.fontSize(15)
Blank()
Image($r('app.media.ic_public_ok'))
.width(16)
.aspectRatio(1)
.fillColor($r('app.color.common_green'))
}
.width('100%')
.height(50)
.border({ width: { bottom: 0.5 }, color: $r('app.color.common_gray_border') })
Row() {
Text('深色模式')
.fontSize(15)
Blank()
Image($r('app.media.ic_public_ok'))
.width(16)
.aspectRatio(1)
.fillColor($r('app.color.common_green'))
}
.width('100%')
.height(50)
}
.padding({
top: 15,
bottom: 15,
left: 30,
right: 30
})
.backgroundColor($r('app.color.white'))
}
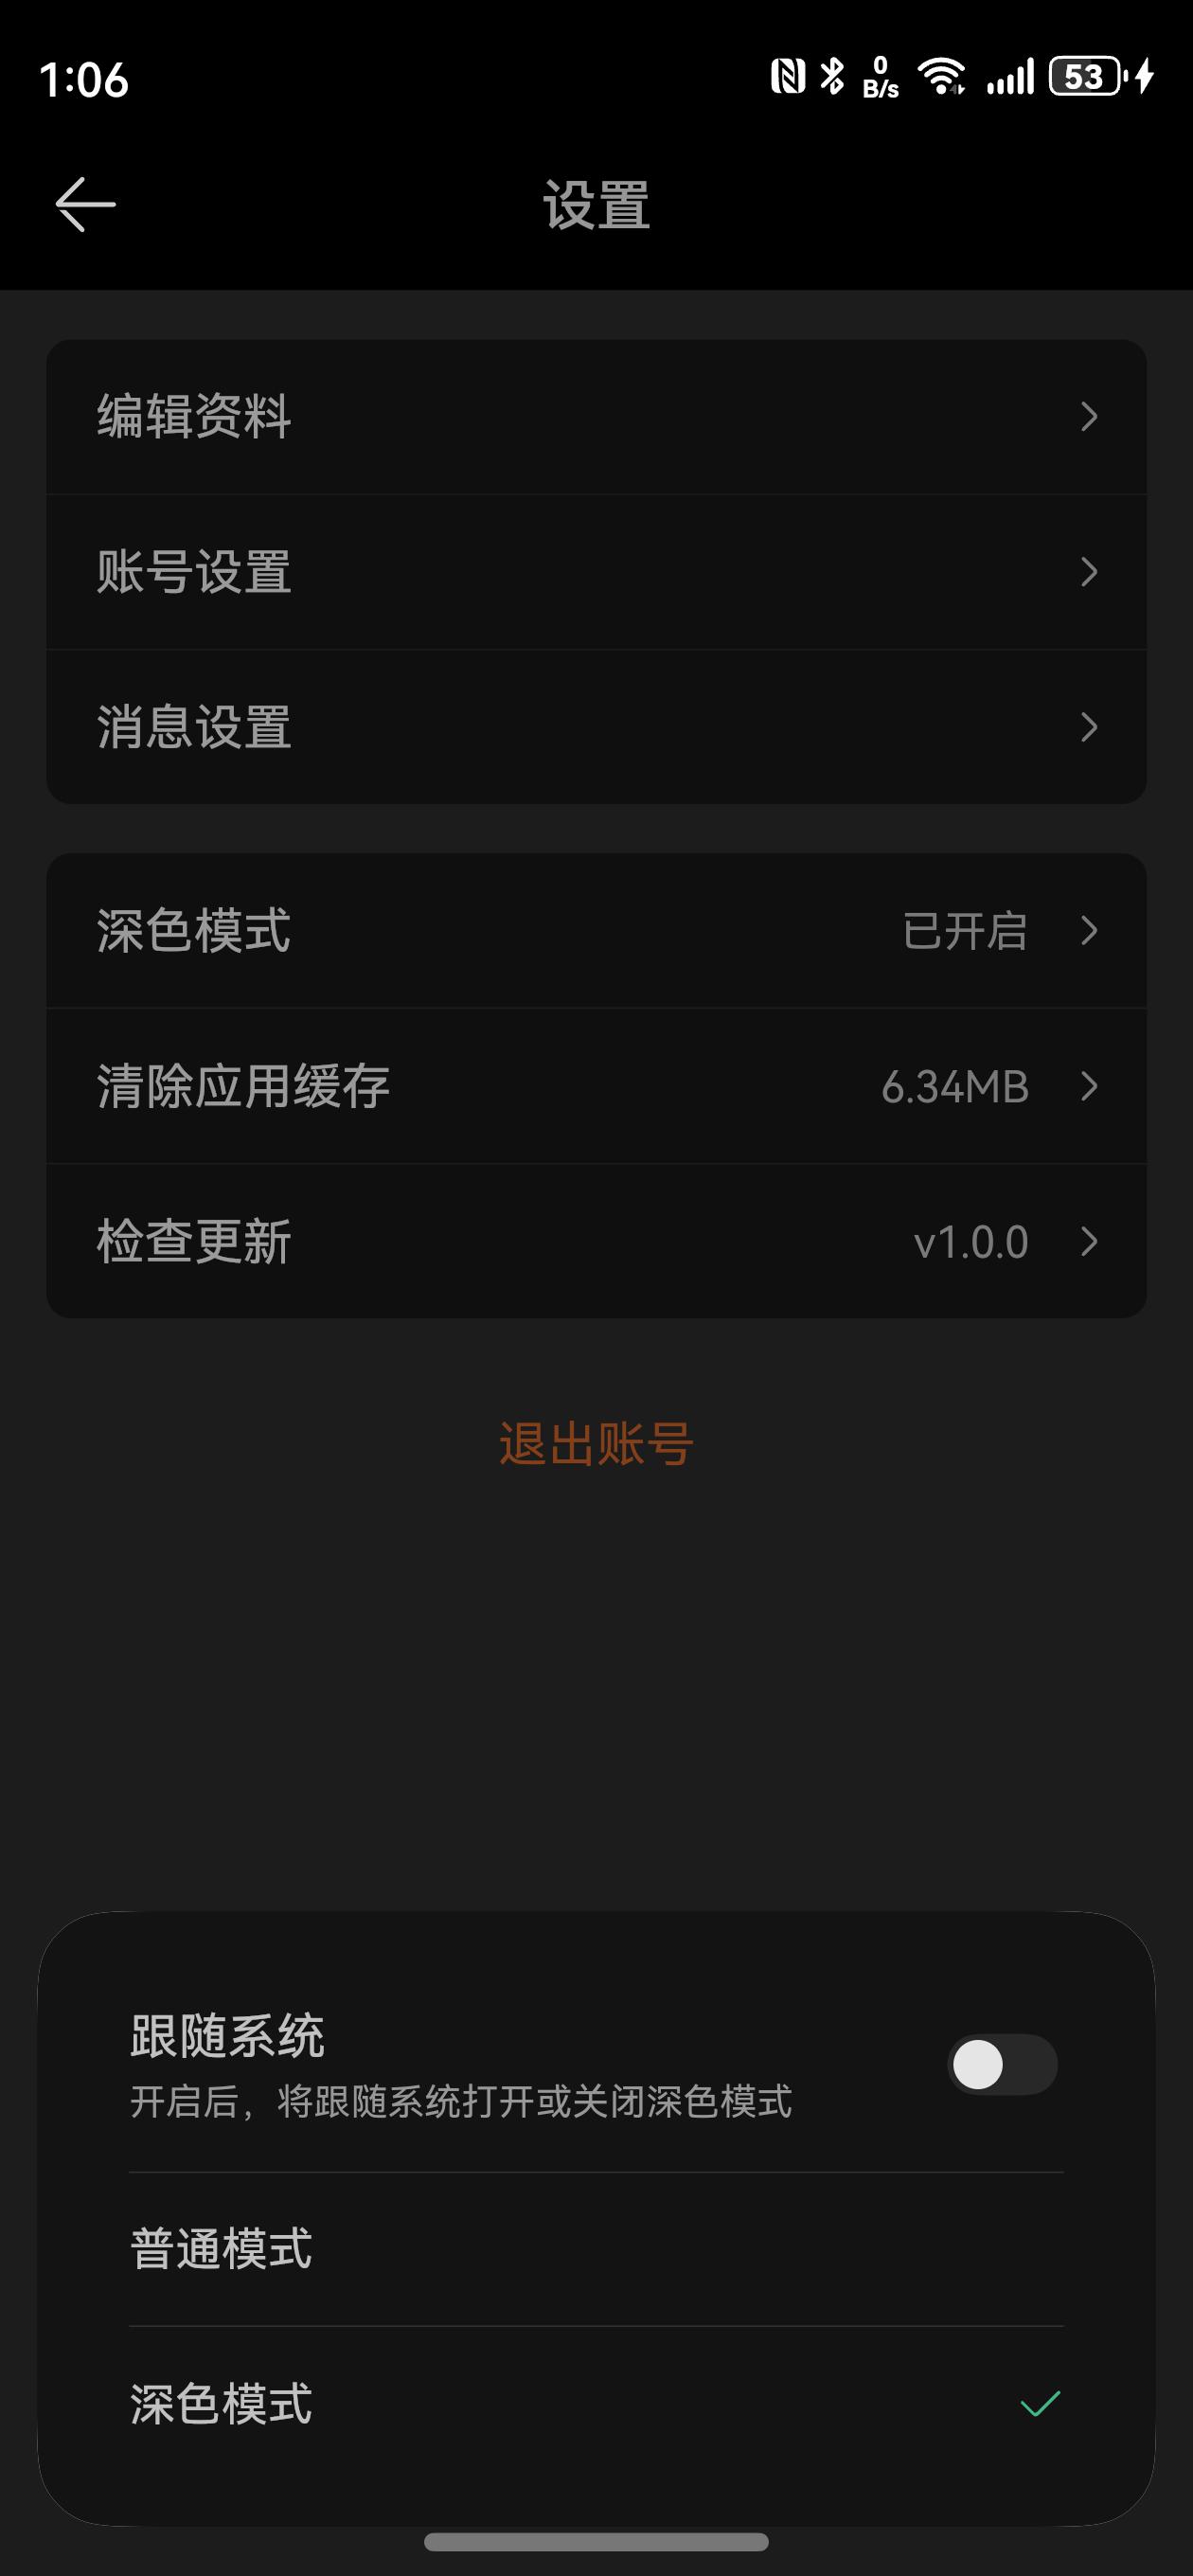
}2)使用对话框
SettingsPage.ets
  dialog = new CustomDialogController({
    builder: SettingsThemeDialog(),
    alignment: DialogAlignment.Bottom
}) this.toolsBuilder({
name: '深色模式',
value: '已开启',
radius: 1,
onClick: () => {
this.dialog.open()
}
})主题工具
目标:封装一个主题工具类,默认设置亮色主题,提供跟随系统、亮色、暗色三个方法
前置知识:
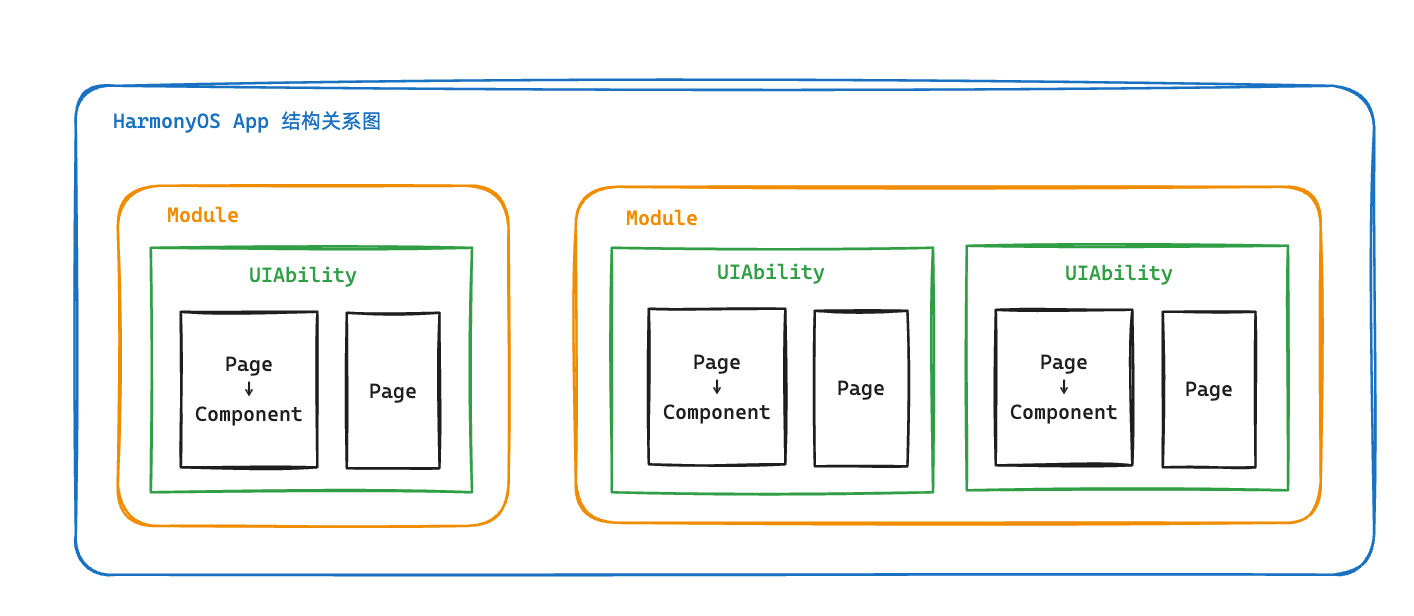
ApplicationContext.setColorMode 设置应用的颜色模式。
一个应用的大致结构
utils/Theme.ets
import { ConfigurationConstant } from '@kit.AbilityKit'

export const ColorModeKey = 'hc-color-mode'

class Theme {
  initTheme() {
    // 持久化颜色主题,默认值亮色模式
    PersistentStorage.persistProp<ConfigurationConstant.ColorMode>(ColorModeKey,
      ConfigurationConstant.ColorMode.COLOR_MODE_LIGHT)
    // 取出现在应用存储的颜色主题模式
    const colorMode = AppStorage.get<ConfigurationConstant.ColorMode>(ColorModeKey)
    // 设置应用颜色主题模式
    this.setTheme(colorMode!)
  }

  setTheme(mode: ConfigurationConstant.ColorMode) {
    AppStorage.set<ConfigurationConstant.ColorMode>(ColorModeKey, mode)
    const ctx = AppStorage.get<Context>('context')
    ctx?.getApplicationContext().setColorMode(mode)
  }

  // 跟随系统
  notSet() {
    this.setTheme(ConfigurationConstant.ColorMode.COLOR_MODE_NOT_SET)
  }

  // 暗色
  setDark() {
    this.setTheme(ConfigurationConstant.ColorMode.COLOR_MODE_DARK)
  }

  // 亮色
  setLight() {
    this.setTheme(ConfigurationConstant.ColorMode.COLOR_MODE_LIGHT)
  }
}

export const theme = new Theme()
实现主题切换
目标:实现主题设置,默认是亮色主题,可设置暗色主题,可以设置跟随系统
实现步骤:
- 先让设置应用默认为亮色主题
- 实现跟随系统颜色和亮色主题切换,实现暗色主题和亮色主题切换
- 设置页显示是否开启暗黑模式
落地代码:
1)先让设置应用默认为亮色主题 pages/Index.ets
auth.initUser()
+theme.initTheme()
2)实现暗色主题和亮色主题切换, 实现跟随系统颜色和亮色主题切换 SettingsThemeDialog.ets
  @StorageProp(ColorModeKey) colorMode: ConfigurationConstant.ColorMode =
ConfigurationConstant.ColorMode.COLOR_MODE_LIGHT- 实现跟随系统颜色和亮色主题切换
        Toggle({
          type: ToggleType.Switch,
          isOn: this.colorMode === ConfigurationConstant.ColorMode.COLOR_MODE_NOT_SET
        })
          .onChange((val) => {
            if (val) {
              theme.notSet()
            } else {
              theme.setLight()
            }
})- 实现暗色主题和亮色主题切换
if (this.colorMode !== ConfigurationConstant.ColorMode.COLOR_MODE_NOT_SET) {
        Row() {
          Text('普通模式')
            .fontSize(15)
          Blank()
          if (this.colorMode === ConfigurationConstant.ColorMode.COLOR_MODE_LIGHT) {
            Image($r('app.media.ic_public_ok'))
              .width(16)
              .aspectRatio(1)
              .fillColor($r('app.color.common_green'))
          }
        }
        .width('100%')
        .height(50)
        .onClick(() => theme.setLight())
        .border({ width: { bottom: 0.5 }, color: $r('app.color.common_gray_border') })


        Row() {
          Text('深色模式')
            .fontSize(15)
          Blank()
          if (this.colorMode === ConfigurationConstant.ColorMode.COLOR_MODE_DARK) {
            Image($r('app.media.ic_public_ok'))
              .width(16)
              .aspectRatio(1)
              .fillColor($r('app.color.common_green'))
          }
        }
        .width('100%')
        .height(50)
        .onClick(() => theme.setDark())
      }
3)设置页显示是否开启暗黑模式 SettingsPage.ets
  @StorageProp(ColorModeKey) colorMode: ConfigurationConstant.ColorMode =
ConfigurationConstant.ColorMode.COLOR_MODE_LIGHT this.toolsBuilder({
name: '深色模式',
value: this.colorMode !== ConfigurationConstant.ColorMode.COLOR_MODE_DARK ? '已关闭' : '已开启',
radius: 1,
onClick: () => {
this.dialog.open()
}
})未使用颜色资源情况
目标:处理未使用颜色资源的情况
1)先存储一个是否是暗色主题的应用状态
  setTheme(mode: ConfigurationConstant.ColorMode) {
    AppStorage.set<ConfigurationConstant.ColorMode>(ColorModeKey, mode)
    const ctx = AppStorage.get<Context>('context')
    ctx?.getApplicationContext().setColorMode(mode)
    // config.colorMode 只有 COLOR_MODE_DARK 和 COLOR_MODE_LIGHT , 也就是可以判断是否是暗色
    AppStorage.setOrCreate('isDark',
      (ctx as common.UIAbilityContext).config.colorMode === ConfigurationConstant.ColorMode.COLOR_MODE_DARK)
  }
2)分别处理对应的问题
- 首页的筛选按钮
views/HomeCategory.ets
@StorageProp('isDark') isDark: boolean = false .linearGradient({
angle: 90,
colors: [[this.isDark ? '#00131313' : '#00FFFFFF', 0], [this.isDark ? '#131313' : '#FFFFFF', 0.285]]
})- 自定义加载 dialog
components/HcLoadingDialog.ets
@StorageProp('isDark') isDark: boolean = false .backgroundColor(this.isDark ? 'rgba(255,255,255,0.6)' : 'rgba(0,0,0,0.6)')清除应用缓存
获取缓存大小
前置知识:
- storageStatistics.getCurrentBundleStats 第三方应用异步获取当前应用存储空间大小(单位为Byte),以Promise方式返回。
落地代码:SettingsPage.ets
  @State
  cache: string = ''

  calcCache() {
    storageStatistics.getCurrentBundleStats()
      .then(res => {
        this.cache = (res.cacheSize / (1000 * 1000)).toFixed(2) + 'MB'
      })
  }

  onPageShow(): void {
    this.calcCache()
  }
清理缓存
前置知识:
accessSync(path: string, mode?: AccessModeType): boolean以同步方法检查文件是否存在。rmdirSync(path: string): void以同步方法删除目录。- 应用有两个缓存目录,一个 entry hap的,一个应用的
落地代码:
  clearCache() {
    const ctx = getContext()
    const ctxCacheDir = ctx.cacheDir
    const ctxExist = fileIo.accessSync(ctxCacheDir)
    if (ctxExist) {
      fileIo.rmdirSync(ctxCacheDir)
    }
    const app = ctx.getApplicationContext()
    const appCacheDir = app.cacheDir
    const appExist = fileIo.accessSync(appCacheDir)
    if (appExist) {
      fileIo.rmdirSync(appCacheDir)
    }
    promptAction.showToast({ message: '清理完毕' })
    this.calcCache()
  }
应用信息
当前版本
前置知识:
- bundleManager.getBundleInfoForSelf 以异步方法根据给定的bundleFlags获取当前应用的BundleInfo,使用Promise形式返回结果。
落地代码:SettingsPage.ets
  @State
  version: string = ''

  aboutToAppear(): void {
    this.getVersion()
  }

  getVersion() {
    bundleManager.getBundleInfoForSelf(
      bundleManager.BundleFlag.GET_BUNDLE_INFO_WITH_APPLICATION
    )
      .then((res) => {
        this.version = 'v' + res.versionName
      })
} this.toolsBuilder({ name: '当前版本', value: this.version, radius: 2 })应用设置
目标:低版本跳转设置页面,可以忽略 requestPermissionOnSetting 的逻辑
参考文档:startAbility
let want: Want = {
  bundleName: 'com.huawei.hmos.settings',
  abilityName: 'com.huawei.hmos.settings.MainAbility',
  uri: 'application_info_entry',
  parameters: {
    pushParams: 'com.itcast.pass_interview'
  }
};
const context = getContext(this) as common.UIAbilityContext
context.startAbility(want)
发布上架
参考:https://developer.huawei.com/consumer/cn/doc/harmonyos-guides-V5/ide-publish-app-V5